Showing posts with label western. Show all posts

Thursday, July 18, 2024

Wild Strawberries and the Old West

 Hello all, and thanks for reading today!


This was my most recent sewing project, completed in 11 days of inconsistent work on it. 


 The shirt was a gift for my mother's birthday and I went to town a bit with extra details. The most fun part was seeing it done, of course, but the construction went fairly smoothly, which is not always the case for me :) Collared shirts used to seem daunting, but with the pattern I have they are actually not scary at all. Unless you are afraid of interfacing and pattern instructions, you should be able to make one of these :)

I should mention, like I did in the first post where I reviewed this pattern, that the instruction to attach the front of the shoulders to the back of the shoulders is MISSING. So if you are considering purchasing this pattern be aware of that!

Also, my collars (I will not say the pattern collars) turn out so thick in their construction that I don't like to use the snap at the very top of the collar. I left it off of this shirt because I was low on snaps and I knew my mother felt the same way about tight collars that I do. My little brother calls the top button the "choker button." 

I made my own twist on this pattern by curving the collar, making short sleeves, adding my own sleeve cuff details, and curving the bottom of the pockets inwards a bit more among other things.


I would have added more of those fun pearl snaps to the sleeves and pocket flaps except I only had enough to do the main shirt closure. So I did a little cross-stitch to ornament the non-functional sleeve tabs while keeping them attached to the sleeve. 

This is the second time I've made this pattern, (here's the first time) and both times I used "upcycled" fabric, aka, fabric from the skirts of dresses I had made a few years ago that I hadn't worn much and didn't like. I like re-purposing fabric in this way, and since most of my skirts from this era had ~2 or more yards of fabric in them, they are easily turned into something else :)

to God be the glory,
Miss Humphrey


Tuesday, March 26, 2024

Spring!

Hello all!

I made my first Summer dress earlier this month, when the warm weather was getting into my bones. Not quite practical for the sun-then-snow nature of March in the High Desert, but I'm sure it will become quite useful when it is scorching in a couple of months. For now, it can be transformed into a warmer jumper with the addition of a cute blouse.


I made it using this Simplicity pattern. It was a good pattern and after I found the particular pieces for my size and cut them out, whipped up quickly. It did have an invisible zipper in it, which always complicates things, but I was satisfied with how it turned out. 


I came up with an idea for a "one piece wrap blouse" earlier this year. 
Well, alright -- it isn't quite one-piece, but it's pretty close. Here's a diagram I've drawn up:


The basic idea is a bodice that is completely one piece like the one in the picture above (minus the attached ties you see.) Technically, all that you'd have to do is hem the entire shape, attach ties and sew the shoulder fronts to their backs, and voila, you have a blouse. 
 I did add sleeves to mine, as well as Velcro at the lower neckline to keep it shut for modesty's sake. Oh yes, I added a bit of blue eyelet trim as well, for modesty's sake to say nothing of pretty accents. The blouse pictured above was my first try at this concept and holds lots of room for improvement, but it was as good start. I like the idea of making sewing simple, and especially with blouses since they tend to daunt some of us. This idea uses ties as a closure instead of buttons, clasps, or a zipper, which greatly simplifies things. 
The blouse could definitely benefit from shaping, for wearing comfort as well as for not looking like this:
Flattering, eh?

(It looks much better worn on a person than on a dressform, by the way.)

So that's a work in progress that I may return to sometime to perfect.


Aside from sewing, I made a birthday card today with the theme of wildflowers.

It was rather busy - or shall we say elaborate instead?

I had fun with all those decorative borders!


Spring is crowding out the brown around here. I LOVE it when the valley turns green. It makes me so happy!
In a few months, it will look like this. Can't chase away all the brown!
It's funny how this scenery, with its small amount of spring growth compared to many places, has grown on me over the years. Coming from a wet Oregon valley as a little girl, I sure disliked the dryness of this country, but now I love it. (With a sort of love that still appreciates it when the farmers below irrigate their pastures! Relative dryness, not Sahara please.)

Brave little souls!

to God be the glory,
Miss Humphrey

Know ye not, that so many of us as were baptized into Jesus Christ were baptized into his death? Therefore we are buried with him by baptism into death: that like as Christ was raised up from the dead by the glory of the Father, even so we also should walk in newness of life. For if we have been planted together in the likeness of his death, we shall be also in the likeness of his resurrection:
Romans 6:3-5


Monday, February 5, 2024

My First Western Blouse

 Hello all,

Well, the Year of the Blouse is off to a good start. I received this pattern for Christmas and it was the first sewing project I plunged into after the holiday. I really like the results!! The pattern...plus a little bit of connecting loose ends...will produce a professional-level Western shirt. What do I mean by connecting loose ends? Well, there's a little guesswork in this pattern. Nowhere in the pattern does it instruct you to connect the back of the shirt to the front at the shoulders, though it clearly shows them connected in a later step. There's also no specifics for what size fastening snaps to use; so we ranked this pattern as "not the best quality." In addition, the sizes also seemed to run a bit small. However, I am still happy with my results!

(Side note: I don't usually sew with patterns, anyway. I'm used to connecting 110 more loose ends than this pattern gave me ;) )

Let's see what it made!

I used view C of the pattern - the simplest view.


For this shirt's material, I re-used the skirt of a dress I had made that fell out of favor with me.
This pattern included a lot of shaping that is quite nice. 


I don't think I've ever done so much topstitching on one project in my life. This shirt was full of it! I love the resulting "store-bought" look it gives.
I also learned to set snaps during this project. I like the western look of the "pearl" snaps. 


The "sleeve-strap" (or whatever this is called) can keep my long sleeve snapped out of the way of whatever I'm doing. I dislike that you can see the raw edges of the sleeve seams when you roll the sleeve back (though this defect is hidden in the pic above.) If I were making this shirt for someone else, I would finish the sleeve seams so that you didn't have threads dangling down and looking messy.

My apologies for missing a week in posting - I hope, as all good bloggers do, and always say - to be more consistent in posting ;)
I have lots of content for the blog now, so perhaps that will motivate a more rigorous posting schedule. 

to God be the glory,

Miss Humphrey

Tuesday, August 8, 2023

Summer Turquoise

Hello all,

During our extended stay at The Manse, I've made a few dresses. Here's the first!

I wore this one to watch a fiddle contest along with a cowboy hat and boots. Yes, you can be western and wear a dress!

My grandmother added the ruffle to the bottom of the skirt. I really like the result!


The skirt is shaped rather than gathered or pleated, so it attaches smoothly to the bodice. I'm pretty happy with how it turned out!

to God be the glory, 

Miss Humphrey


Monday, July 10, 2023

Fiddle Camp Wardrobe Planning

 Hello all! 

I'm pretty excited - next week, I'm headed to Fiddle Camp! I thought I'd share what I'm planning to wear for the four days of camp. 

These are not special, fancy outfits. Actually, it's a good sample of what I wear day-to-day! Comfort matters more to me than style on a 90 degree day, but that's not saying that I have to wear something plain and ugly, or skimpy and revealing. 

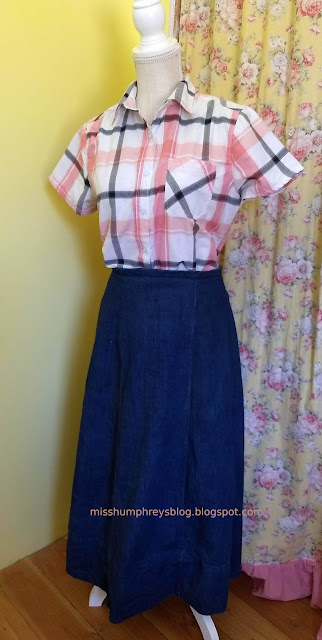
Do you want to guess how much use this Edwardian walking skirt gets? A lot!! It's a great, everyday jean skirt, but its gores and delicate waistband save it from being boring :) It goes with the western, 1800s style that is so dear to my heart, and I can wear it with every blouse I own, which is wonderful!!
The plaid shirt is the Stillwater Supply Co. brand. My mother and I purchased them on sale at Bi-mart.  These are very nice western shirts!

This is a one-piece style dress I made earlier on in my sewing hobby, and while it is definitely not perfect, I like it! I might wear it as a jumper instead of a sort-of sleeveless dress. I might improve a few things on it before I take it to camp - we'll see!

On the last day of camp, we're having class performances. I plan to wear my blue circle dress on that day for something a little more dressy!


We mustn't forget the cowboy hat!

And there you have it, my wardrobe planning for 2023 fiddle camp.
 I'm so happy to get to wear homemade clothes much of the time. The world of sewing unlocks beautiful possibilities!

Have a great mid-July, everyone!

to God be the glory,
Miss Humphrey

Monday, April 3, 2023

Edwardian Skirt In Denim

Hello all,

My mother and I made matching jean skirts recently, using this Edwardian pattern

(A Note to the Interested: This is an E-pattern. My mother recommends finding someone who sells the paper pattern, unless you have a free evening to spend wrestling with your printer and the printed pattern, which has to be taped together.)


The original (unhemmed) Edwardian length of the skirt was beautiful...but impractical for the everyday use this skirt was destined for.

...The hemmed version...


The skirt is gored, with a narrow waistband. It has a placket in the back.


Finding one of my favorite blouses to match it was icing on the cake!

to God be the glory,
Miss Humphrey


Monday, March 13, 2023

Plaid Skirt Tutorial


Hello All!

I have been asked for a pattern for the plaid skirt I put on the blog once. Since I didn't use a pattern, here's a tutorial instead! I'd like to introduce my guest editor, my mother, who helped with part of this tutorial. 

I'm doing this skirt doll-sized, but the tutorial is for YOU...or your doll :)  

For you, you'll need fabric, (How much? I estimated 3 yards) and, if it's for you, a short (~ 8") zipper, or other fasteners (example: skirt hooks, snaps). 

I suggest reading through this tutorial, or at least looking at the photos, before you start. 

You can do it. Enjoy!

Miss Margaret...my model today


For reference, this is the shape that you will be cutting on the fold of your fabric, but first we have some measuring to do. 


1. First, measure your waist where you want the skirt to sit. Divide that measurement by 4.  Dolly's measurement is 12", so that'll be 3". I'm doing this because the skirt is 2-paneled and we're working with 1/2 of one panel right now.


2. Our final measurement was 3", however we must allow for seams and ease, so I added an inch to that measurement (that will include 1/2" seams).  I would suggest adding 3/4" to 1" if you're making a skirt for yourself, but for the doll version you will only need to add 5/8" or so. 


3. Next, decide how long you want the skirt.

4. Measure that length on your yardage, and cut across your fabric at that point. You want two of these panels.


5. Now make a diagonal cut (you can draw first if you like!) from your waist measurement (with what you added in step 2!).

Ta-da!


6. Unfold your skirt and sew up the sides! On one side, leave the upper part of the side unsewn about 8" from the waist to put your zipper or placket in. For the doll version, leave about 3" for a placket. 


7. If you wanted to put a zipper in the side, now is a the time to do it. Use your favorite method to put in a zipper, or find a video tutorial if you do not know how. For the doll skirt, we did a placket. You can do a placket for an adult skirt as well, and if you choose that option you will need a skirt hook and some snaps. For the doll skirt, velcro works!

Now, it's time to put the placket in! 

7a. Open up the side where you didn't quite sew up the seam all the way. Take a strip of your fabric (about 2" wide), of a generous length. It really doesn't matter how long it is, as we will cut off any extra after we sew it on. 


7b. Pin that strip to your open side, paying special attention to the very middle (an extra pin on each side of the very middle helps). Make sure the side seam of your skirt is open flat. 

Here it is from the other side (splay the side open so that it is almost flat).


7c. Sew down from the top edge of skirt, start at 1/2" and taper down to 1/8" or less at the very middle. Take it slow as you get to the middle, reaching under and feeling for folds or wrinkles, getting them out of the way so that your sewing remains as flat as possible. When you get to the middle (where the skirt side seam is), pivot slightly and sew up the other side, going from your tiny seam allowance back up to 1/2 at the top. Check the middle and make sure it was sewn without any tucks, wrinkles, or holes! You may have to fix it by hand sewing a bit if you mess up. 

7d. Now fold back one side of your strip of fabric (the side that is on the front of your skirt), leaving the other side open flat. Pin back that folded part. Trim off the excess evenly with the top of your skirt. 

7e. Since this is a doll skirt, a quick zig zag on the edges worked for finishing. You might want to do something more on the adult version. 


The placket should lay flat against the other side, a perfect extension of your seam. 

 8. Now for the waistband!

You could measure and do some math for the waistband, but here is the "customize as you go" method!

8a. Cut a strip long enough to go around your waist with a generous extra bit on each end (for seams and overlap etc.). Make this long strip about 3"wide. 

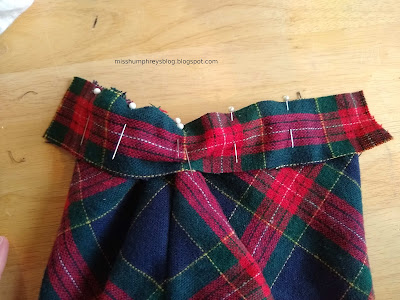
8b. Find the middle of your waistband and put a small snip in the edge. Pin band to the skirt waist, right sides together. You want to match your snip to the side seam that doesn't have the placket. All excess waistband material will be hanging over at the placket side-- don't worry about it for now. Pin around, and when you get to that folded part of your placket (photo 7d) make sure it stays folded when you pin over. Make sure the lay-flat side of the placket stays flat when you pin over. 

8c. Sew waistband to skirt, right sides together. 

8d. Trim off the edge of your waistband material, leaving at least 1/2" or a bit more past your placket 
(here you can see the folded-back part of the placket, and how it is sewed right into that waistband seam!)

8e. Now fold the top down a bit toward the inside of the skirt...

...and then fold the whole thing backwards (in half, right sides together). Your waistband should be the shape in the photo.


8f. Sew down over all your folds. Notice that the edge of the placket is your guide for your sewing.


Now turn the waistband, utside out and inside in.  Voila! A perfect finished edge, enclosing all those seams. 

8g. Whip stitch the waistband down all around. 


(You see the how the waistband goes over the  flat side of the placket here)

When the placket is closed, you can hardly tell it is there. 

9. For the doll skirt you can use a snap or a bit of velcro to fasten the waistband. For your skirt, you will want to put a skirt hook on the waistband here, and possibly snaps on the placket. 


10. Time to level the bottom of this skirt!


 Measure the shortest point of your skirt (the place where it's furthest from the floor) when it's on a model/dress form (if you don't have a dress form, put on the skirt and have a friend help you). Place a pin just above that point. Move around the skirt a few inches and place another pin at your measurement. Repeat the process until you have come all the way around to the front again. 
Next, take your scissors and trim around the skirt, using the pins as your guide.

11.  Hem your skirt. This is the shape of my skirt, trimmed and hemmed! 

(Yes, I did my doll skirt hem before the waistband)

Side view


This tutorial has been a long time in the making, hopefully it will work for you! 

To God be the glory,
Mrs. and Miss Humphrey


Free-Hand Sewing ~ Aqua Blooms & Sprigs Dress ~ Retro 1930's

Hello again! Here's the next edition of Spring Sewing '25!  I was inspired by a beautiful dress made by Kristen at Verity Vintage St...