Showing posts with label Sort of a Tutorial. Show all posts

Tuesday, March 18, 2025

Spring Sewing

...You make the going out of the morning and the evening to shout for joy.

You visit the earth and water it;
you greatly enrich it;
the river of God is full of water;
you provide their grain,
for so you have prepared it.
You water its furrows abundantly,
settling its ridges,
softening it with showers,
and blessing its growth.
You crown the year with your bounty;
your wagon tracks overflow with abundance.
The pastures of the wilderness overflow,
the hills gird themselves with joy,
the meadows clothe themselves with flocks,
the valleys deck themselves with grain,
they shout and sing together for joy...
~from Psalm 65~

Winter's last moments - through the years.

March is a stormy month, a wrestle between winter and warmth here in the High Desert. Last year we had 70 degree weather for a bit, and the year before that we had snow. It's unpredictable!

We're still lookin' dry over here, but it's been raining and snowing quite a bit. In another month or two, it will look more like this!


I have done a rather small amount of clothes-making this year, hence my long absence on the blog. Handwork has made up the majority of my sewing, as I finish a quilt top I've been making for...two years? now. But with Spring coming, certain fabrics in my collection have called to me to be played with. 

Introducing my first Spring '25 project!

This simple paneled skirt was a lovely way to ease into spring sewing. It was finished in an evening and was delightfully uncomplicated!


Isn't that interesting fabric? My favorite thing about it is that it lends itself to so many blouses! Red, white, two shades of green, that lovely baby pink, yellow, orange...And yet it does not make you look like a walking rainbow.


My skirt has 8 panels, a simple waistband, and a short zipper in the back. I used my pinking shears to cut most of my panel-bottoms, so I only turned the hem over once when I hemmed the skirt. 
This is the first skirt I've made with pockets!! Definitely one of my favorite features of this skirt!

I have drawn some diagrams for the basics of a pieced skirt. Hopefully they will be useful!

Below are close-ups of a few of the sketches:
To make a fitted skirt like this, it's important to take a waist measurement. You then divide that number by how many sections you wish to have in your skirt. If you have a waist measurement of 30" and you plan to use 10 sections in your skirt, each should be 3" at the top - but don't forget the seam allowance! I like to allow myself 1/2" seam allowance, so I would add a whole 1" to the measurement and make each panel 4" wide. The bottom of your triangle-like shape can be as wide as you want! The wider it is, the more flared and swirly your skirt will be - fun, huh?

Sew your panels together into a skirt, right sides together of course. You can leave ~6" (or however long your zipper is) unsewn at the top of one of your seams to insert your zipper into. 
When you've finished sewing the seams, (but before you put your zipper in!) and are ready to make your waistband, measure it to your completed skirt top (+ seam allowance) and sew a "tube" of fabric that length - and however wide you want it. Mine is about 3/4" wide. 
If you want the inside of your skirt to look finished, you can follow this tutorial for a few different waistband options. I was not very particular about the inside of this skirt, especially since I used pinking shears to cut most of my pieces, so I attached my ironed "tube" as seen in the diagram above. I put right sides together and sewed it on, then folded it back to show a beautiful smooth waistband! Then I attached my zipper. 
There are many tutorials online for attaching zippers, so I will not kink up my brain trying to write on the subject. You know how zippers are.


That's all for today. Thanks for reading! 
I hope to be back soon with more spring sewing.

Miss Humphrey


Monday, May 6, 2024

Free-Hand Nightgown

 Hello Readers,

I made a nightgown recently that I thought I'd share with you. It is a very simply, but comfy design that is easily made without a storebought pattern. 


We were gifted with some Lanz flannel years ago, and I finally got around to doing something with it.
This is the basic idea of the layout I did on my fabric. I didn't measure how many yards of fabric I used (!) but I'm guessing it was 2 yards. I had to really squeeze the neckline facing out of some scraps, and it is not a nice, finished facing by any means, so I would suggest using another piece of fabric for facings if you're dealing with only 2 yards of fabric. I held the fabric up to myself to get the neckline and shoulder in the right places for the yoke and cut it out. If you'd like more in-depth instructions on this, here's a blog post that has a yoke tutorial in it.


{unfolded skirt}
Then I loosely stitched two rows of gathering across the top of skirt. On the front skirt, I clustered gathers on each side as shown below:

On the back skirt, I did roughly even gathers all the way across. I attached the skirts to the yolk front and back. 


I sewed up the side seams of my skirts to the corners. I don't remember the exact order I sewed the rest of the nightgown in, but I can tell you the steps :) 
I hemmed the skirt and set the sleeves in, and hemmed them as well. If you'd like to see how to set-in a sleeve you can find a tutorial in this post. I made a pleat in the top of each sleeve because I had extra material.

I put the neckline facing in and tried the gown on, only to realize...
The back of the skirt looked rather ridiculous. It just had way too much yardage in it! The front of the skirt had managed pretty well, but not the other side. So I took in two vertical tucks on either side of the back skirt, just below the yoke. They were ~6-7" long and were effective in gathering up some yardage. However, the look was not professional and next time, I would probably just cut a narrower skirt for the back! 
Well, you learn something new every time. I really like this nightgown and it whipped together in one evening. If you try something of the sort let me know!

to God be the glory,
                                                                   Miss Humphrey


Sunday, December 31, 2023

How I Made My Christmas Dress


Hello all!
I thought I'd show you how I made my Christmas dress I posted recently. I'm not calling this a tutorial because it lacks the detail you'd find in a pattern tutorial, for instance. But you might enjoy following this "how I did this" post if you have some experience sewing and aren't afraid to trust your instincts!

This is how most every dress of mine starts out: my fabric is folded in 1/2 the long way, and the end is folded over to make 4 layers of fabric. This section is where I cut my bodice from.

This is basically my bodice shape, without the front neckline marked. I made the bodice fairly wide so that I wouldn't have to put a zipper in this dress. (YAY!) 
Here's that shape on my folded fabric.


And when unfolded:


 I wanted to mention that I'm not just cutting out this bodice where it seems right...exactly. Some areas I've got the hang of through sewing tons of these kinds of bodices, and I can eyeball my measurements. But often when I'm making a dress I will hold the fabric up to myself and make more precise measurements in certain areas. This time I noted where the edge of the neckline should fall and where to place the shoulder as well.
It's important to add in seam allowance in these measurements. If you want your neckline to fall in a certain place, mark it ~1/2" closer to your neck. You will take in the extra material when you sew. This way you won't end up with a wider neckline than you want. 
It's especially important when you're measuring the depth of the neckline. Always err on the smaller side of things - you can always cut a larger neckline but it's not so fun to deal with a deeper neckline than you planned. Ask me how I know. 


Now it was time for me to cut my front neckline. In this picture I've unfolded my bodice, folded it in 1/2 the long way, and cut my front neckline.
 If you omit the folding in this step, your back neckline will be just as deep as your front neckline. That may be common sense to you, but for some reason, I have made this mistake multiple times, which is why I feel the urgency to warn you :)
Personally I dislike the feeling of wearing a dress with equal necklines in front and back. I once knew someone who tried to stitch the missing piece back into the back neckline. Hey, it was in a lining, so the treatment worked enough for my - I mean, *her* - purposes without being noticeable. Honestly, it shouldn't have, and I certainly can't recommend it. I dislike such sewing shamblery.


Here I did something that makes me feel a bit uncomfortable: cutting my shoulder seams. I usually would not do this, but because I wanted to insert a collar into the shoulder seams I took the plunge.


Next I cut out neckline facings. I usually would do a once-piece facing, but since I had already cut my shoulder seams, I did one for the front neckline and one for the back. If you'd like a visual tutorial for this, scroll down to the bottom of this post.
 
In this picture, I've sewn the facing to the front neckline, turned it over and ironed it. When you do a squarish-neckline like this, snip the corners of your seam allowance. It will help the fabric flex around your neckline easier. 
It's great to do this on curves, too, like the one on my back neckline.

Next I had darts. Oh, the dreaded darts. (The darts are ironed flat-ish in this picture.) 
Bodice shaping has caused me so much trouble in the past! Sometimes darts work nicely and sometimes they are a pain in the neck. I haven't gotten this part completely down yet, folks, so I can't give you a recipe for success! But I have figured out how to make them equal distances from the sides and middle of the front bodice, which is pretty important.
Once you've got one dart sewn in or marked, fold the bodice in half and copy your measurements onto the other side of the bodice. You can do this by snipping wherever you've snipped on the top layer or drawing the dart as best you can.

Now, on to the collar.
First I unfolded my piece of fabric vertically. Then I folded the end over, just like I did when I cut the bodice out. 

This is the shape I cut out of my fabric. It follows the neckline from the shoulder and then curves off after that.

This picture skips ahead quite a bit! Basically what I did here is cut 4 of the shape in the last picture (If you remember, my fabric was folded in half, so I just had to cut 2 of the shape pairs of collar pieces.) Then I sewed the corresponding pairs together, right sides together, leaving the tops open since they're going to sewn into the shoulder seams anyway. This way I had a lined collar. I pressed the two collar pieces flat (I think I starched them as well), and sewed them onto the front bodice shoulders. I think I sewed the back bodice onto the front at the shoulders after that, and then stitched the collar down to the center bottom of my bodice. I used a decorative stitch to stitch over the two edges of the collar as they came together below the neckline and continued down the bodice. I also sewed the bodice side seams together around this time.
Whew, that was a long description! I should have taken more pictures. 

After this, I wrestled with the collar a bit, trying to smooth out a wrinkle that had happened in one side more than the other. I will skip those details and go on to the sleeves!


My sleeve and my sleeveband, both folded. 
I just so happened to have coordinating fabric for the main print of this dress, and it was fun to put both the wine/burgandy colors together.
Here's a sleeve graphic if you are curious or confused about sleeve measurements.


From here, I puffed the top of the sleeve by gathering two rows of stitches around the curve at the top. I also gathered the bottom of the sleeve. I sewed the sleeve to the bodice and then added the sleeve band.
For the sleeve band, I sewed the ends of the fabric strip in the pic above, right sides together, to make a band. I proceeded to fold this in 1/2 the long way and starch it. This I added to the bottom of the sleeve I had gathered. I had to add a few pleats to it as well to fit it into the sleeveband, since I had extra material. I also placed a tuck in each sleeve as I showed you in the last post. I'll show you how again:

Making a tuck like this is very easy - turn the sleeve inside out and sew the two layers (front and back) together, vertically, near the edge of the sleeve. 


When you turn the sleeve back right-side-out, you'll have a cute sleeve tuck. 


Now, on to the skirt! 
I measured out a length of material that I wanted for my skirt; I used about as much fabric as I had left over from 5 yards of fabric after I had cut all of the above out :)
I use the 45" dimension of my yardage for the length of my skirt and put ~6" of material into my hem since the skirt was going to be too long for practicality. It did add to the dress weight, but I didn't want to cut it off in case I wanted to lengthen the hem someday. I sewed the ends of my skirt right sides together, and then pinned it to my bodice and took in a passel of pleats. I had soo much material to fit into the circumference of that little bodice!
Once I had sewn my pleats in, I topstitched them. After experimenting with different tactics to keep my front pleats lying smoothly down, I topstitched them all down ~5" so that they wouldn't stick out where they weren't wanted. 


I sewed two ties from my coordinating fabric (how to: cut a length of fabric a little more than twice as wide as your finished tie will be, sew the edges and one end, right sides together, turn it inside out and press it) and attached them near the side seams of my bodice. 

And that is a summary of how I made this dress! I hope it inspires you or gives you some pointers about your own sewing. 


to God be the glory,
Miss Humphrey


Tuesday, December 19, 2023

Time for a Christmas Dress!

 Hello all,

I'm finally back with a project that I'm excited to show you: a Christmas dress! 

This dress took portions of two days to make, and the sewing process was very smooth compared to many dresses I've wrestled with! 


I apologize for the lesser quality of some of my photos. I think I'll switch over to a new camera soon.


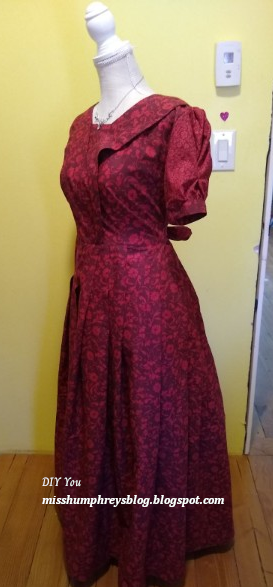
The dress features a long, full pleated skirt. 


I top-stitched ~4-5 inches down the front pleats so the pleats would not flare out in places they were not wanted :)


The sleeves turned out VERY puffy, so I put a tuck in each one to gather in some of the excess and shape the sleeve. I remember first noticing this style on a dress that my grandmother had made, and was inspired by it. 
Making a tuck like this is very easy - turn the sleeve inside out and sew the two layers (front and back) together, vertically, near the edge of the sleeve. 


When you turn the sleeve back right-side-out, you'll have a cute sleeve tuck. 


For the collar on this dress I was inspired by this blouse. I like the idea of a collar that is sewn into the shoulder seams instead of wrapping all the way around the back of the dress. Instead of the collar ending in a charming tie however, I pulled the ends down into the waistline.


To God be the glory, 
Miss Humphrey


Monday, June 19, 2023

How I Made This Dress, Part 3...Finishing Up

When I have the bodice completely done on a dress, I have usually passed all the hard work. Just have to attach a simple skirt, and I'll be done! 

Not so with circle dresses. Those can be finicky to the very end. 

And not so with the tiered skirt to this dress, because I had a lot of work ahead of me to make all those gathers!

My mother told me how to do a tiered skirt. Here's the "formula" I used for how long each of my panels needed to be.

Here's how I did my panels...


I cut a panel and sewed the ends together (right sides together) to make a round. On one of the panels, I had to add extra yardage to make it the right length. This dress fit easily into 4 yards of fabric, using the excess from one panel to complete another.


I sewed 2 rows of gathers on one edge.


It would have been cute to just hem the bottom of this panel and have a blouse!


I gathered the second panel until it fit pretty well with my last panel, then sewed it up!


To this I added a short panel to complete the skirt.
I made a sash out of the dress material, and I was...done!!

Here's some more dress pictures.


Hope you enjoyed this dress-making process!

to God be the glory,
Miss Humphrey


Interview!

 Hello All, We're on the subject of books today! I recently wrote The Lawman's Daughter , a clean western romance/mystery novel. Tod...